
Buttonwillow 13CW
Perhaps the most infamous track in Southern California, Buttonwillow in its 13CW configuration is widely known for its complex corner sections and infamous bus stop.
Don’t be overwhelmed .the best piece of advice was given to my good friend and fellow driver:
“ take each corner one at a time, master that piece of the puzzle, and then move on to the next”
I will break down the track turn by turn, explaining what I believe to be the fastest and smoothest way around this configuration.
This guide is meant to help both beginners and veterans alike, but it is important to note, that this is a guide on this course in a Time Attack situation. This driving line has no defensive options and should be used in HPDE/Time Attack or qualifying sessions.
One important thing to note before I begin, not all cars are created equal, some cars may have certain characteristics that may not apply to my style of driving (momentum car, or high down-force cars (open wheel)), may have different approaches. But for the sake of this guide, I will assume this is a car similar to my S2000 (time attack car with medium down-force) or my mostly stock C7 Corvette. You can see both of my PB’s at this course on YouTube, here are the links:
That being said, lets get started with a turn by turn guide for Buttonwillow in 13CW configuration
Turn 1 (Sunrise)

Turn one is often overshot and misunderstood for a few different reasons. It is actually a bit faster then Sunset ( the final turn) and a completely different shape/camber and curve. The important thing that helped me understand this corner is that you are able to brake very late, while maintaining the ability to get on throttle just after you turn in. This is possible due to the decreasing radius, In short, brake as late as your car can, but shoot to get on throttle on the Green arrow ( I actually get on the inside curb, but your results may vary). In slower momentum cars, you are usually able to increase throttle to 100% much sooner then a high horsepower car. If you watch my C7 lap, I actually get on full throttle a bit too soon and the rear end steps out. I could have avoided this if I gave 20% throttle at apex and slowly increased it, remember, smooth is the name of the game when it comes to getting a fast lap around Buttonwillow.
Off Ramp

This section is extremely complex and can have multiple approaches depending on your cars set up. The goal here is to carry as much seed as possible (duh) while being able to get on throttle early (also duh) However, its the approach that makes these goals entirely complex.
I personally begin braking at the kink and trail into the corner, placing the car on the inside curbing, there is a little extra camber and a slightly different asphalt that will give you extra grip if you hit it “just right”. Timing is crucial here if you want to maintain momentum and get on throttle early, you must feel when the suspension sets (that feeling you get when the rebound is keeping the shock down), and get on throttle before the camber changes. This will make it possible keep the rear end under control as you shoot out of the corner, if you do this right, it feels like your car is glued to the ground. You then will shout out with the highest longitudinal G force acceleration of anywhere on the track, I logged 0.45G in the s2k and 0.65G in the C7.
Some cars that may not have the turn in capability may need to move left as they brake in order to make the corner wider. Thus easier for it to stick!
I-5

Pretty self explanatory here, I-5 is a decently long straight after the exit of Off Ramp, the thing to think about is your approach into one of the more counter intuitive sections, Cotton Corners. My goal here is to brake early enough to not track out into the corner, and setting up for the exit.
Cotton Corners
First thing to note about this section, the only thing that matters, is the entry and exit.

The goal should be, to brake early from I-5 so you can make the turn in and not push to the outside of the first corner, then (depending on your car) you can get on throttle at that green arrow for a moment, only to left foot brake a bit to get the car to turn in a similar manner to the entry ( not tracking out). Once that is complete, you can get back on throttle up the hill (with a slight lift if need be) at the apex of the exit, only to get right back on throttle for the next ( and perhaps my favorite part of the track).
This is difficult to put into words, so I also included a clip of my laps in this section, notice how early i get on throttle, and how much i make it a priority to stay on throttle as much as possible.
“That little middle section? I wouldn’t worry about that little section.”
Grapevine to Club Corner

This section is, not to sound like a broken record, all about the exit. In low HP and high grip cars, there is a slight lift at Grapevine that may be required, But it is important to get on throttle quickly and to not sacrifice to much speed leading up to bus stop.
Important note here, there is a small elevation gain on the straight from Grapevine to Club Corner, in lower horsepower cars, it is not necessary to lift. In higher horsepower cars, My C7 Corvette for instance, the bump may cause a moment of weightlessness, leading to a loss of traction. so it may be a good idea to lift as you crest the hill.
The entry into club corner is simple, turn in nice and early, anticipate any under-steer your car may exhibit. And power down through into the bus stop.
Club Corner to Bus Stop
Carry as much speed leading up to Bus Stop, managing any over-steer or under-steer your car may have into the second section of Club Corner.

Bus Stop
Welcome to the turn you will love to hate, in lower horsepower cars, this corner has the potential to ruin your lap, or turn into a hero lap. I’m not going to get into suspension tuning to much on this guide, but just know that it is very important on this corner.

The goal here, is to brake early enough in order to get on throttle at the green arrow, and maintain throttle over the curb. This causes the car to be more stable over the “jump” (curb) and gives you more speed into riverside, which is essentially the largest full throttle section at Buttonwillow for low horsepower cars.
For higher horsepower cars, get on throttle at the same point, just with much less. try 10% throttle at first and work your way up from there.
The corner is a lot more complex then it seems, but the goal should be: Brake early enough to get the car rotated so you may get on throttle before the jump. Momentum should push you out to the outside curb, if it didn’t, well, you didn’t go fast enough!
The most important thing here: Maintain smooth turn-in, smooth application of throttle, and be prepared to catch the rear end on the landing after you jump over the curb. Slowly work up to your speed goals here. Each lap go a bit faster until you find the edge of that landing curb! see below for an example:
Truck Stop

Truck Stop is typically flat out on a car with Grip>power, In my S2000 I don’t lift at all, in the Corvette, I don’t either, but I do short shift a bit to maintain momentum and not upset the car too much as I enter riverside,.
Riverside:
Riverside is a extremely fast banked right hand turn that has a deceptively late apex. The line shown below can be modified if you are in a power limited car, If you don’t have enough power to outweigh the grip of your car, you may be able to hug the inside of this turn completely.

This turns speed is greatly affected by your cars down-force package, a good example is S2000’s without Aero (large rear wing) can not take this corner flat out on 200TW tires. however, if you the same car and slap a wing on the back it should be able to take the corner flat out. No lift required. (your results may vary due to suspension tuning and balance)
The line shown below is what I attempt to do in the Corvette. Of course the lack of aero on that car has other plans for me most of the time. There is no perfect area to get back on throttle here. As most cars can perform maintenance throttle throughout the corner.
Minimum speed is a great metric to log in this section, remember to be smooth here, and use the banked turn to slow the car if need be.
And for gods sake, don’t lift completely or the wrong end will lead in front of you, and if you must go off, go off in a straight line. Do not attempt to save the slide if you’re heading off course.
Here is a clip of me driving the Corvette from Bus Stop to the exit of Riverside:
Phil Hill

Exiting riverside will dump you into a relatively long straight that leads to a uphill braking zone for the following turn, Phil Hill. this section is famous for people overshooting and destroying expensive parts on the car.
My Friend and fellow Time Attack competitor, Johnson Mac, going wide into Phil Hill.
“Some say there is a massive graveyard of splitters that are laid to rest just north of Phil Hill.”

The approach to pill hill can be simple, though exiting riverside may push you out to the left side of the track, it is important to set up for the fast left right turn after, so it may be necessary to give up some speed, and get to the right side of the track in order to avoid under-steering off track at high speed.
The approach to Phil Hill can be intimidating due to its blind apex, but it is important to turn in just late enough to line up the exit in a straight line, allowing you to get on throttle just after the crest of the hill. when you get this section right, it feels great, if you get it wrong. Well, your splitter may end up in Phil’s collection forever…
Here is this section seen at speed.
Sweeper
Exiting Phil Hill (splitter intact hopefully) will lead you down another long straight, just after a left kink. That kink should be flat out in most cars.
“ I can not stress enough how important the exit is here, giving up a little bit of entry speed pays extremely large dividends on the exit. ”
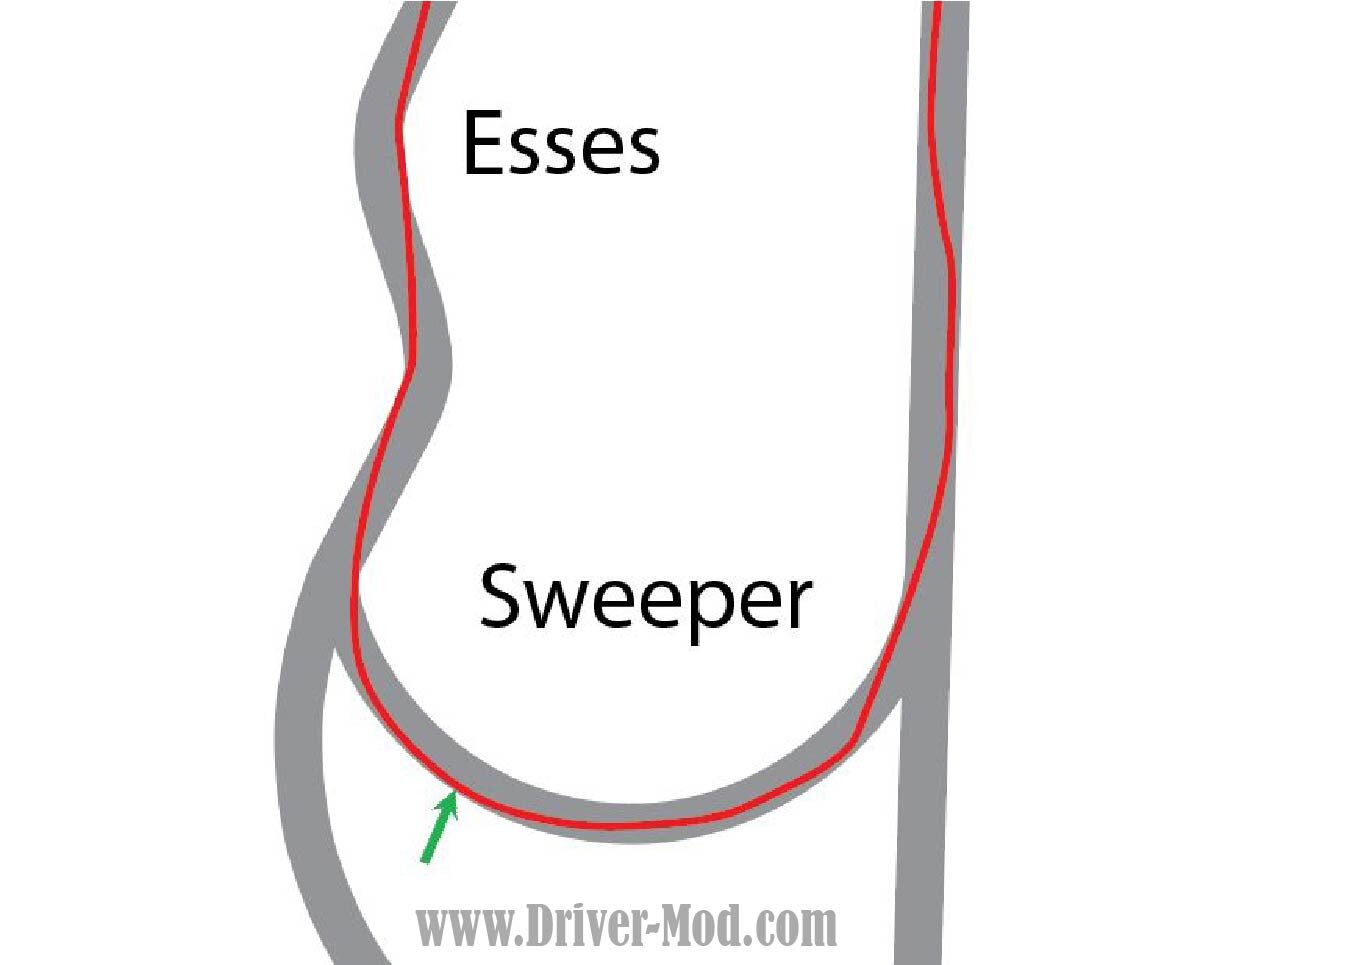
The entry into sweeper can vary depending on your cars chassis. This complex corner is typically shown as a single late apex, the line you see in the graphic, is in fact a double apex. I don’t want to fixate on the line as much here, but the idea is this: Brake very very very late, use the width of the corner as a braking zone. once you have turned in, immediately focus on how you can rotate the car in the correct way, allowing you to get on throttle ( and stay on throttle)
This sweeping right turn is an excellent data point when testing a cars break away tendencies, it also acts as a great p;lace to compare tire compounds, as it shows how much sustained G force a tire can exhibit without camber.
You goal should be to leave the corner on throttle at that green arrow ( or around it) its tough to give a exact point here as it will vary from car to car.
Here it is from my perspective:
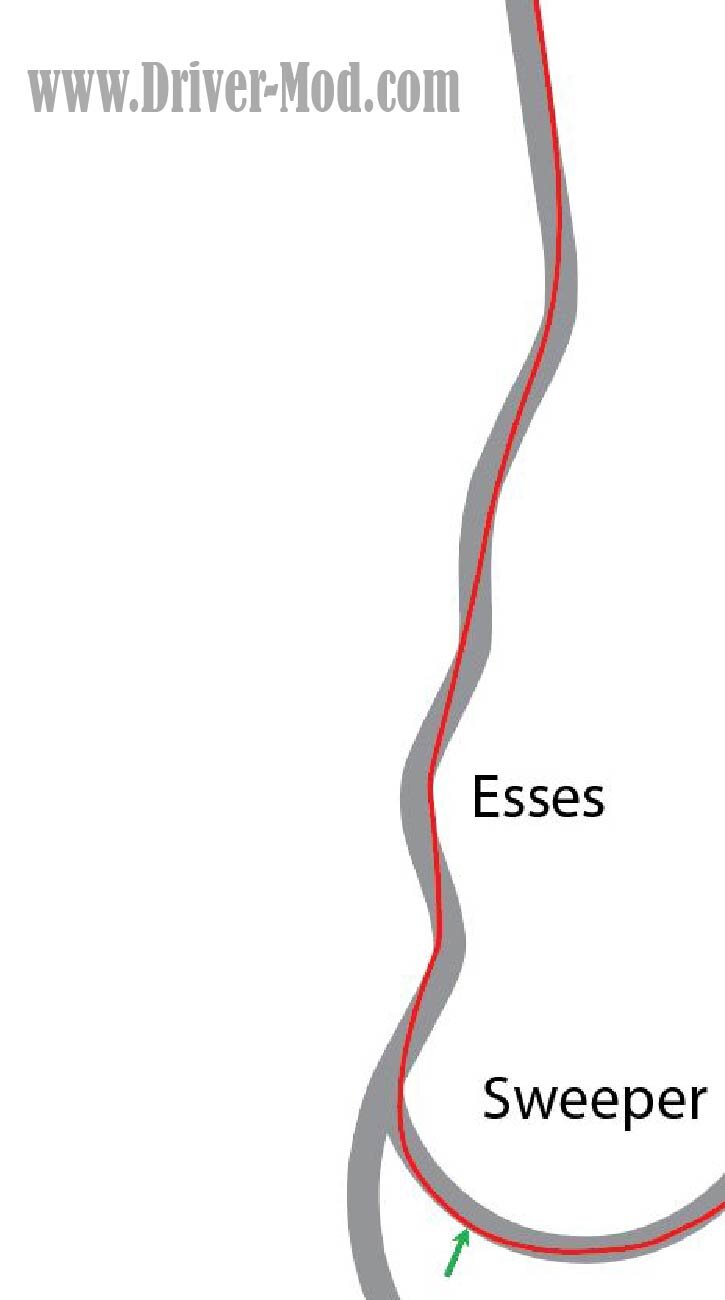
Esses
The Esses can be taken flat in a low horsepower car, relatively drama free, a good thing to note is that the curbs get larger the further you go down the straight. When you have a higher horsepower car, this section can be very dangerous for a few reasons.
Reason 1: if you upset the car at high speed for what ever reason, its important to go off in a straight line ( preferably to the right) as there is a large rollover risk here, and the wall on the left comes up FAST when you are doing 80 MPH sideways. ask me how I know.
Reason 2: The final kink may not be able to be taken flat out, in some fast cars it has a tendency to push the car off of the edge to the right, which may shoot you left towards the wall, or right into a spin.
The curbs are typically safe to get on if you cars suspension is stock, or soft enough.
You will now be driving down the back straight towards the final corner.
“You made it! now just one last corner! surely you wont mess this one up?”
Sunset, The Final Boss at 13CW

Slightly banked left hand turn leading to the front straight and finish line, seems simple right? well, you would be wrong. This corner has claimed more Hotlaps and PB’s then any other corner. Even on my PB here, i get stuck in my own head and miss third gear, losing 3/10’s of a second to a rookie mistake.

Sunset isn’t a particular hard corner, but it gets in your head, which is why it is even more important to stay calm, brake early and throttle at the apex, nice and smooth. Did i also mention this turn has claimed more cars then any other at ButtonWillow? Important tip: if you overshoot this corner, go off in a straight line, don’t try to hero it back on, 1/2 the time you will lose the rear and hurl right towards the pit wall. AKA “The Wall Of Champions”
There is a large dip at the apex of sunset, infamous for unsettling a car, and bending wheels. 9/10 its best to stay out of it, you have been warned.
Final Thoughts
It is my hope that this guide, will help bring you to a better understanding of this infamous track, and learn to appreciate its complexity. Although its nearly impossible to cover how all cars behave, I do believe that deconstruction of the course turn by turn will teach many how to approach a racetrack for a HPDE day.
See below for a full track map with the throttle points and driving line. And thanks for reading!
